
Driving can be a thrilling experience, but it often comes with its fair share of minor accidents and mishaps. One of the most common casualties of everyday driving is a scuffed bumper (car bumper). Whether it’s a scrape from misjudging a parking space or a brush against an object, a scuffed front or rear bumper can be an unsightly blemish on an otherwise pristine vehicle. However, fear not! In this article, we will delve into the art of scuffed bumper repair, exploring the various techniques and options available to restore your car’s beauty and regain your pride of ownership. You can either fix it yourself or take it to a body repair shop. We go over all of your options in this article on how you can repair your scratched bumper and remove scratches that can devalue your vehicle.
Understanding Scuffed Bumpers
Before we delve into the entire repair process, let’s understand what a scuffed bumper entails. Most modern cars have bumpers made of a durable plastic material known as polyurethane. While this material is designed to withstand impacts and minor collisions, it is not impervious to scratches and scuffs. Scuffed bumpers occur when the outer layer of the plastic bumper scratches or rubbed off, leaving behind a visible mark that can be an eyesore and can require sculpting and painting to get the scratched area back to it’s original shape.
Assessing the Damage Scratched Plastic and Clear Coat
The first step in repairing a scuffed bumper is to assess the extent of the damage. Minor scuffs and scratches that haven’t penetrated the surface layer can often be repaired using simple techniques. However, deeper or more extensive damage may require professional intervention or even bumper replacement. Evaluating the severity of the scuff will help determine the appropriate course of action.
Repair Your Scratched Bumper: Scratched Plastic Bumper Repair DIY
For minor scuffs and scratches, do-it-yourself repair (diy repair) methods can often yield satisfactory results. In this article, we’re going to show you how to repair a scratched bumper. Here are a few techniques you can try:
Scuff Repair Area: Cleaning and Sanding Paper
Begin by thoroughly cleaning the affected area to remove any dirt or debris. Once clean, lightly sand the scuffed area with fine-grit sandpaper to smoothen the surface and reduce the visibility of the scuff.
Heat Gun or Boiling Water Method
If the scuff is shallow, heat applied to the damaged area can help restore the plastic’s texture. You can use a heat gun or even pour boiling water over the scuffed area while carefully massaging the plastic with a microfiber cloth.
Toothpaste or Baking Soda Paste
Surprisingly, everyday household items like toothpaste or a baking soda-water paste can be used to diminish the appearance of scuffs. Gently rub the paste onto the affected area using a soft cloth, then wipe it clean with a damp cloth. We’re not saying this is the appropriate repair material for a professional repair, but it could be a quick solution in many cases.
Professional Scuffed Bumper Scratch Repair
For more severe scuffs or if you prefer a flawless finish, professional repair services are the way to go. Trained technicians have access to advanced tools and materials to ensure a high-quality restoration. Here are some common techniques professionals use:
Fill and Paint
Technicians will find any scratches and fill deeper scratches with a plastic filler or putty and then sand and buff them down to create a smooth surface and remove any imperfections. They will then match the paint color of your vehicle, use masking tape and plastic cover on the repair area, and carefully apply it, followed by a clear coat for a seamless harden finish.
Heat and Pop
For minor dents and scuffs, professionals may use heat to soften the plastic, followed by carefully manipulating and popping the damaged area back into shape.
Bumper Replacement
In cases where the scuff is too severe or the bumper has structural damage, replacing the entire bumper might be necessary. This can be done for both plastic bumpers and metal bumpers alike, and it ensures a brand-new appearance and guarantees the longevity of the repair.
Steps to Repair Scuffed Bumpers
Fixing a scuffed bumper to restore the original look typically involves several steps. Keep in mind that these steps may vary depending on the severity of the scuff and the type of bumper material (e.g., plastic bumpers, metal bumpers, etc). Whether it’s scratched plastic or scratched metal. Here’s a general guide to help you fix a scuffed bumper:
Clean the bumper
Thoroughly clean the bumper using a mild detergent or car wash soap. This will remove any dirt, debris, or wax that might be on the surface. Rinse the bumper with water and allow it to dry completely before proceeding.
Assess the damage
Evaluate the extent of the scuff. If it’s a minor scuff or scratch that hasn’t penetrated the bumper’s material, you may be able to fix it yourself. However, if the damage is deep or the bumper is cracked, it’s best to consult a professional for repairs or replacement.
Heat the bumper (if applicable)
If you have a plastic bumper, you can use a heat gun or a hairdryer on high heat to warm the scuffed area. This step helps make the plastic more malleable, making it easier to work with and potentially remove the scuff.
Apply a bumper repair kit
There are various bumper repair kits available that can help you fix scuffs and scratches. These kits usually contain filler or compound that matches the color of your bumper. Follow the instructions provided with the kit for the best results.
Sand the scuffed area – remove scratches
If the kit includes sandpaper, use it to gently sand the scuffed area. This step helps smooth out any rough edges or imperfections. Be careful not to apply too much pressure, as you don’t want to groove in the damaged area or damage the surrounding paintwork.
Apply the filler or compound
Use a plastic spreader or a small brush to apply the filler or compound to the scuffed area and across the scratch. Work in thin layers, building up the material until it’s slightly above the surface of the bumper.
Sand and blend the repair area
Once the filler or compound has dried, use fine-grit sandpaper to carefully sand the area by hand. Start with a higher grit and gradually move to finer grits to achieve a smooth finish. Feather the edges of the repair to blend it with the surrounding bumper.
Polish and wax the repair area
After sanding, clean the area again to remove any dust or debris. Apply automotive polish to restore the shine and then wax the entire bumper to protect the repaired area and provide a uniform appearance.
Remember to read and follow the specific instructions provided with the bumper scratch repair and refinishing kit you choose, as different products may have slightly different procedures. Additionally, if you’re unsure about your skills or the severity of the damage, it’s recommended to seek assistance from a professional auto body repair shop.
Mastering Scuffed Bumper Repair: The Path to Proper Training for DIY Enthusiasts
This part of the article aims to guide DIY enthusiasts on the path to acquiring the proper training required for effective and efficient scuffed bumper repair.
Understanding the Basics
Before diving into training, it is essential to familiarize yourself with the basics of scuffed bumper repair. Research the different types of bumper materials, such as plastic, fiberglass, or composite, and understand the typical repair processes associated with each material.
Online Resources and Tutorials
The internet is a treasure trove of valuable resources for learning DIY skills, and learning to repair a bumper is no exception. Look for reputable websites, forums, and video tutorials that provide step-by-step instructions, tips, and techniques for repairing scuffed bumpers. Websites like YouTube, automotive forums, and dedicated DIY websites can be excellent starting points.
Enroll in Automotive Repair Courses
Consider enrolling in automotive repair courses offered by local vocational schools, community colleges, or training centers. These courses can provide hands-on experience and expert guidance from experienced professionals. Look for programs that specifically cover bumper repair techniques, including surface preparation, filling, sanding, priming, painting, and blending.
Seek Mentorship
Reach out to experienced automotive repair professionals or local body shops and inquire about the possibility of mentorship or apprenticeship opportunities. Shadowing a skilled technician can provide invaluable insights into the intricacies of scuffed bumper repair. Additionally, a mentor can guide you through the process, offer personalized advice, and correct any mistakes along the way.
Attend Workshops and Seminars
Keep an eye out for workshops and seminars focused on automotive repair, especially those that include sessions on bumper repair. These events often feature industry experts who can share their knowledge, demonstrate techniques, and answer specific questions. Participating in such events allows you to network with like-minded individuals and gain hands-on experience.
Practice on Scrap Bumpers with Bumper Scuffs and Damaged Areas
To hone your skills, acquire scrap bumpers from salvage yards or through online marketplaces so you can learn how to repair a scratched plastic bumper and repair tears and cuts without damaging your own vehicle. These inexpensive bumpers can serve as a canvas for practicing various repair techniques. Experiment with different tools, materials, and approaches to gain confidence and develop your proficiency.
Invest in Proper Tools and Materials
To perform scuffed bumper repair effectively, you’ll need the right tools and materials. Purchase a quality set of sandpaper, a dual-action sander, a heat gun, a plastic welder, a bumper plastic body filler kit, primers, paint, a clear coat, and other necessary supplies. Investing in the proper equipment will ensure better results and make the process more efficient.
Safety First
Always prioritize safety when working on automotive repairs. Wear protective gear such as safety goggles, gloves, and a mask. Ensure that your workspace is well-ventilated, and follow proper safety procedures when using power tools or working with potentially hazardous chemicals.
Repairing scuffed bumpers yourself can be a rewarding and cost-effective endeavor, but it requires proper training and practice. By leveraging online resources, enrolling in courses, seeking mentorship, attending workshops, and practicing on scrap bumpers, you can acquire the skills necessary to perform scuffed bumper repair with confidence. Remember to prioritize safety throughout the process and enjoy the satisfaction of revitalizing your vehicle’s appearance through your newfound expertise.
How to Repair Plastic Bumper Scratches
Bumper scuffs and scratches are inevitable, especially when navigating crowded parking lots or tight city streets. These unsightly marks can diminish the overall appearance of your vehicle and even affect its resale value. However, with the right knowledge and tools, you can easily repair a scuffed bumper and restore it to its original condition. In this article, we will guide you through the step-by-step process of repairing a scuffed bumper, using readily available repair kits and materials.
Remove the Bumper Cover
Before we dive into the repair process, it’s important to note that this guide primarily focuses on repairing plastic or fiberglass bumper covers. These materials are commonly used in the construction of bumpers, as well as plastic fenders and door skins. However, the techniques discussed here may not be suitable for metal bumpers or other auto body parts.
Let’s get started with the repair process:
Identify the type of plastic
Before you begin the repair work, it is crucial to identify the type of plastic your bumper is made of. This information will help you choose the appropriate repair material and ensure effective results. Consult your vehicle’s manual or contact the manufacturer to determine the specific plastic type.
Clean the damaged area
Thoroughly clean the scratched plastic bumper using a plastic surface cleaner. Ensure that the surface is free from dirt, debris, and any contaminants that may hinder the repair process. Cleaning the area will also help you identify any additional scratches or imperfections that require attention.
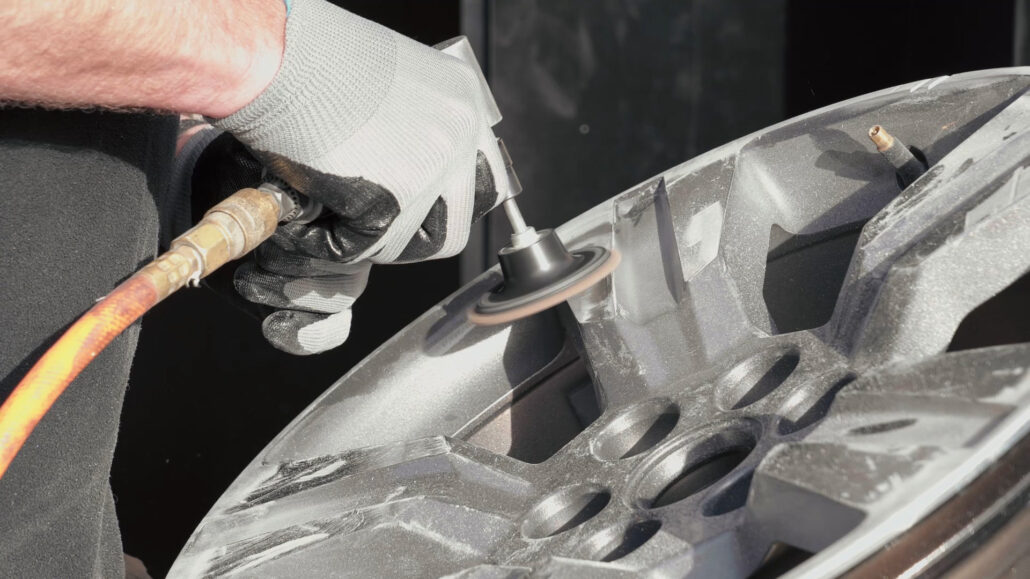
Sand the area
Using sanding paper, carefully sand the scratched area. Start with medium-grit sandpaper to smooth out the surface and remove any loose paint or rough edges. Gradually switch to finer-grit sandpaper to achieve a smoother finish. Be cautious not to sand too aggressively, as this may damage the bumper further.
Apply repair material
Apply a light skim coat of repair material, such as body filler, to the scuff repair area. Follow the instructions provided with the repair kit to ensure proper application. Typically, the repair material consists of a two-part compound that requires mixing with a hardener. Apply two coats of repair material, allowing each coat to dry before applying the next.
Sculpt and shape the repair material
Once the repair material has dried, use sanding paper to sculpt and shape it to match the contours of the bumper. Pay close attention to blending the repaired area with the surrounding undamaged surface. This step is crucial to achieve a seamless finish.
Prime and paint
After sculpting, apply a suitable primer to the repaired area. The primer will help the paint adhere properly and ensure a long-lasting finish. Once the primer has dried, follow it up with a matching automotive paint. Apply multiple thin coats, allowing each coat to dry before applying the next. This will help you achieve an even and professional-looking paint job.
Reattach the bumper
If you had to remove the bumper during the repair process, now is the time to reattach it. Follow the reverse steps of removing the bumper, ensuring you align it correctly with the body of the car. Secure the bumper using the appropriate screws behind metal caps near the trunk or other designated areas.
Final touches
Inspect the repaired area for any imperfections or scratches that may still be visible. If necessary, repeat the sanding and painting process until the repaired area seamlessly blends with the rest of the bumper. Once you are satisfied with the repair, apply a clear coat to protect the newly painted surface and restore the original shine.
It’s important to note that the complexity of the repair process may vary depending on the extent of the damage and the specific repair kit or materials you use. In some cases, deep scratches or tears may require more extensive repair work, such asusing additional fillers or professional assistance from an auto body shop.
In conclusion, repairing a scuffed bumper is a feasible DIY task that can save you a significant amount of money compared to taking your car to a repair shop. With the right repair kit and materials, as well as proper technique and patience, you can restore your scratched plastic bumper to its original shape and maintain the aesthetic appeal of your vehicle. Remember to follow the steps outlined in this guide, identify the type of plastic, clean the area, sand the damaged surface, apply repair material, sculpt and shape it, prime and paint, and finally, reattach the bumper. By investing a little time and effort, you can achieve professional-looking results at a fraction of the cost.
However, if you encounter scratches that are too deep or extensive to repair on your own, or if you feel uncomfortable performing the repair work, it’s always recommended to seek professional assistance from an auto body shop. These experts have the necessary tools, expertise, and experience to handle more complex repairs and ensure a flawless finish.
Repairing a scuffed bumper not only improves the appearance of your vehicle but also preserves its value. So, don’t let those unsightly scratches and scuffs dampen your car’s beauty. Take action, follow the steps provided, and restore your bumper to its former glory. Your vehicle will thank you for it!